- YourGovernment
-
OurCommunity
-
- About Tualatin Advisory Committees Animal Services Community Involvement City Codes City Council City Projects
- Community Crime Reports Customer Service Request Explore Tualatin Now Fire Library Municipal Court Tualatin Today
- Parks & Recreation Passports Permits & Forms Planning & Zoning Police Volunteer Tualatin Moving Forward
-
-
ForVisitors
-
- Parks, Greenways, Recreation and Library Library Parks Public Art Parks and Recreation
- Shopping, Dining, and Entertainment Chamber of Commerce
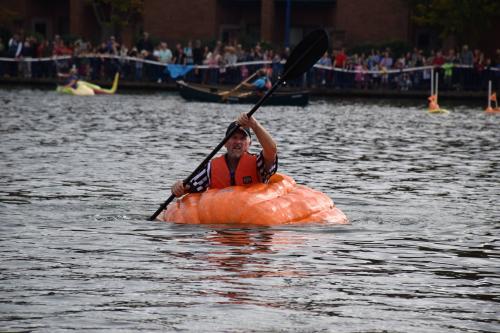
- Community Events Community Theatre Pumpkin Regatta Special Events
-
- DoingBusiness
-
HowDo I?
-
- Apply for a Job Apply for an Advisory Committee Contact the City Council Get a Copy of a Police Report File a Records Request Find Forms
- Find Planning & Zoning Find Public Transportation Find the City Code Get a Business License Get Email Subscriptions/Notifications Locate City Offices
- Contact the City Pay My Traffic Fine Pay My Water Bill Reserve a Facility Sign Up for a Recreation Program Search the Website Volunteer
-
Jim Sherwood's Tips for Growing Giant Pumpkins
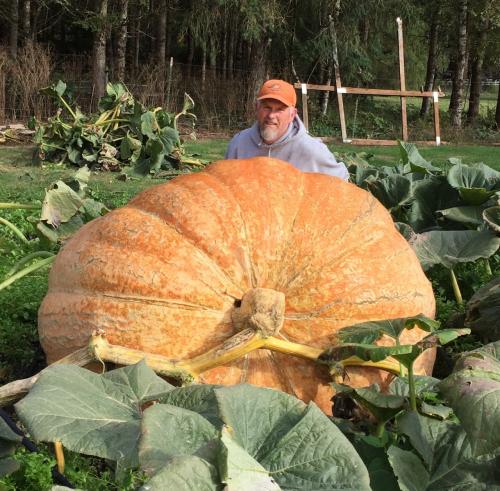
Jim Sherwood is a founding member of the Pacific Giant Vegetable Growers. Jim has been growing giant pumpkins for over 20 years. His personal best weighed in at a whopping 1,868 pounds!
He was recently honored by being inducted into the Great Pumpkin Commonwealth Hall of Fame. He is one of only 29 worldwide that have had that honor.
Jim has paddled in the West Coast Giant Pumpkin Regatta 4 times and has had a pumpkin in every race since the event began in 2004. His favorite thing about growing giant pumpkins is seeing the smiles on people's faces when they see a giant pumpkin!
PRO TIPS FROM JIM SHERWOOD
1) Prepare the soil
Ideal pH should be between 6.7 - 7.2. A good amount of organic matter in the soil is beneficial and desirable. Good tilth is also important, avoid compaction.
2) Start the Seeds
Start the seeds indoors in late April/early May in 4”-6” peat pots or other suitable container. You should use an emery board to file the edges of the seed in improve germination. Soak the seeds for approximately 1 hour prior to planting. Plant the seed pointed side down in your planting medium about 3/4”-1” deep. These pumpkin seeds germinate best when the soil is kept at around 85 degrees. Seedling heat mats are the best source of heat for this process. Plants should be up in 3-5 days.
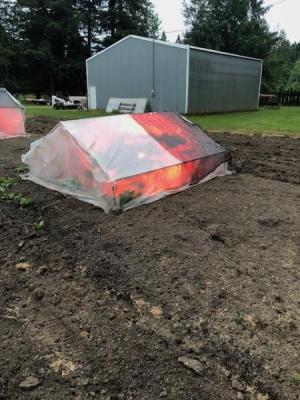
3) Cold Frames
While you are waiting for the seeds to germinate, you should put small cold frames out in your garden where you intend to grow the plants. You should allow about 300-800 sq. ft. for each plant.
4) Transplant
Once the seedlings are beginning to show the first true leaf (the two cotyledons appear first, the first true leaf will appear in the middle.) it’s time to transplant the plants outdoors in your cold frame. A day or two of acclimating to the outdoor temperature wouldn’t hurt the plants prior to actual planting. Plant the seedling in your cold frame with the fold of the first true leaf pointing away from the direction you want the plant to go. Handle these plants with care when transplanting! A mild fertilizer can be added at the time of transplanting, but avoid over fertilizing early in the plants life.
Remember to open your cold frames on warm days to avoid heat stress to the plants. Water occasionally to keep moist, but not too wet. Some growers use small heaters or lights to provide heat during the cold nights, depending on your cold frame this may or may not be necessary. Remove the cold frame when all possibilities of frost have gone.
5) Prune
Once the main vine is established, you will want to begin pruning your plants. Most growers choose the ‘Christmas tree’ style. This involves running your main vine out and keeping only the secondaries at a 90 degree angle to the main stem. All tertiary vines are pruned off. This keeps the plant neat and tidy and easy to manage.
6) Dig Trenches
As the plant is growing, you should dig trenches about 3”-4” deep ahead of each vine (main and secondary) as the vines lay in the trenches, bury the vines. This promotes extra rooting at each leaf inter node. Be careful not to bury the terminal buds when doing this.
7) Pollinate
When the first female flowers appear, it’s time to think about pollinating. Usually the best location to pollinate a fruit is at about 10’ out on the main vine. This usually occurs around the end of June/early July. The female flowers are easy to detect, as they will have a small pumpkin at the base of the flower. Many growers will hand pollinate these females to control the genetics in the pumpkin. This should be done early in the morning while the pollen is fresh and female are most receptive to pollen. If you choose not to hand pollinate, the bees will do a good job for you.
If you choose to hand pollinate, you should choose about 3-5 fresh male flowers, remove the petals and then gently ‘paint’ the pollen all over the ovaries of the female flower until there is a good coating of pollen. The female flower should then be tied up or covered to prevent any other introduction of unknown pollen. This pollen can come from the same plant as the female or other plants to introduce new genetics.
8) Reposition
As the tiny pumpkin grows, gently (and I mean gently!) maneuver the fruit at a right angle to the stem. This allows the shoulders of the pumpkin to have more room as it grows and reduce vine stress. You will eventually need to support this portion of the vine as it grows with the pumpkin. It could be as much as 2’ off the ground at maturity. This repositioning should only occur in the afternoon when the plant is more limber! (trust me on this one!)
9) Cull
To maximize the size of your pumpkin you should only keep one-two fruit on each plant. I recommend pollinating many and then culling the fruit that are the least aggressive.
10) Fertilize
You should be on a fairly regular fertilizing regimen at this point. (usually about 1x per week with a well balanced, low nitrogen fertilizer is best. There are many recipes for fertilizing, most are best achieved by trial and error. Just remember less is best. Don’t subscribe to the “Moron” theory ie... “if a little is good then I should put ‘more on’ and it would be better”. Nitrogen and Phosphorus are important early in the season. After fruit set Potassium and Calcium are more important.
11) Shade
Once your pumpkin is established, you should create a shade structure over the pumpkin. An easy structure consists of (4) metal fence posts with a 6’x 8’ tarp stretched between them. The sun can seriously damage the outer skin of these fruit.
12) Measure
Measure your pumpkins beginning in late July about 1x per week and keep a journal. This will let you know about where your pumpkin’s estimated weight is.
13) Weigh
The first Saturday in October is time to weigh. If you need help lifting your pumpkin, ask a lot of your friends or another member of the PGVG. This could be the toughest part of the whole season. Gently roll the pumpkin up on one side, slide a tarp or other lifting device under the pumpkin. Set the pumpkin down and then lift the other side and gently pull the tarp through to the other side. This should position your pumpkin in the middle. Everyone grab a side and lift! Set the pumpkin on a pallet for easy transportation with a tractor or forklift. Good luck and see you in October!
Hint on watering
Watering can be used for two purposes; 1) as a misting system for cooling during the hot summer afternoons and for 2) watering. Daily watering is preferred to minimize extremes to the plant. If you avoid the drought/wet/drought/wet cycle and try to even out the watering curve, the plants should respond more favorably.
Click any thumbnail image to view a slideshow